Coadd 1D Spectra
Overview
This document will describe how to combine the 1D spectra from multiple exposures of the same object.
Coadding 1D spectra must be done outside of the data reduction pipeline (run_pypeit); i.e. PypeIt will not coadd your spectra as part of the data reduction process.
The current defaults use the Optimal extraction and flux-calibrated data.
See below for the Current Coadd1D Data Model.
coadd1d File
The pypeit_coadd_1dspec script requires an input file to guide the process. The format of this type of Input File Format includes a Parameter Block (optional) and a Data Block (required).
We describe each in turn.
Parameter Block
This optional Parameter Block can set the name of the output file and/or modify default parameters for the script, see Coadd1DPar Keywords.
Here is an example:
# User-defined coadding parameters
[coadd1d]
    coaddfile = 'J1217p3905_coadd.fits'
    sensfuncfile = 'sensfunc.fits' # Required only for Echelle
The coaddfile parameter is optional, if it is not set
the output file will be placed in the same directory as the first spec1d
file named coadd1d_<target>_<instrument>_<start date>_<end date>.fits.
Note
If you are using an Echelle spectrograph
(e.g. keck_nires), you must specify a sensfuncfile generated by
Fluxing a standard star.
See Parameters below for common parameters modified for coadd1d.
Data Block
A Data Block is required to indicate the spectra
to be combined. It always begins and ends with coadd1d read and coadd1d end, respectively.
One should then include the path to the Spec1D Output files,
unless you intend to run the script within the same folder as the data.
Last, the data block provides a table of Spec1D Output files and the object name in each to be coadded. See Spec1D Output for a discussion of the naming.
Here is an example:
# Data block
coadd1d read
  path /path/to/your/reduced/data/Science
                                               filename | obj_id
  spec1d_b27-J1217p3905_KASTb_2015May20T045733.560.fits | SPAT0176-SLIT0000-DET01
  spec1d_b28-J1217p3905_KASTb_2015May20T051801.470.fits | SPAT0175-SLIT0000-DET01
coadd1d end
It is possible to provide only a single entry (it must be the first row)
in the obj_id column.
This will then be used for all of the Spec1D Output files input.
The list of object identifiers in a given Spec1D Output file can be output with the pypeit_show_1dspec script, e.g.:
pypeit_show_1dspec spec1d-filename.fits --list
These can also be recovered from the object info .txt files
in the Science/ folder (one per exposure).
pypeit_coadd_1dspec script
The primary script for 1D coadding is called pypeit_coadd_1dspec,
which requires a coadd1d File to guide the process.
The script usage can be displayed by calling the script with the
-h option:
$ pypeit_coadd_1dspec -h
usage: pypeit_coadd_1dspec [-h] [-v VERBOSITY] [--log_file LOG_FILE]
                           [--log_level LOG_LEVEL] [--debug] [--show]
                           [--par_outfile PAR_OUTFILE]
                           coadd1d_file

Coadd 1D spectra produced by PypeIt

positional arguments:
  coadd1d_file          File to guide coadding process.

                        ------------------------
                               MultiSlit
                        ------------------------

                        For coadding Multislit spectra the file must have the
                        following format (see docs for further details including
                        the use of paths):

                        [coadd1d]
                           coaddfile='output_filename.fits' # Optional

                           coadd1d read
                                filename | obj_id
                             spec1dfile1 | objid1
                             spec1dfile2 | objid2
                             spec1dfile3 | objid3
                                ...
                           coadd1d end

                         OR the coadd1d read/end block can look like

                          coadd1d read
                                filename | obj_id
                             spec1dfile1 | objid
                             spec1dfile2 |
                             spec1dfile3 |
                             ...
                          coadd1d end

                        That is the coadd1d block must be a two column list of
                        spec1dfiles and objids, but you can specify only a
                        single objid for all spec1dfiles on the first line

                        Where:

                        spec1dfile: full path to a PypeIt spec1dfile

                        objid: the object identifier. To determine the objids
                        inspect the spec1d_*.txt files or run pypeit_show_1dspec
                        spec1dfile --list

                        ------------------------
                                 Echelle
                        ------------------------

                        For coadding Echelle spectra the file must have the
                        following format (see docs for further details):

                        [coadd1d]
                           coaddfile='output_filename.fits' # Optional

                           coadd1d read
                                filename | obj_id | sensfile  | setup_id
                             spec1dfile1 | objid1 | sensfile1 | setup_id1
                             spec1dfile2 | objid2 | sensfile2 | setup_id2
                             spec1dfile3 | objid3 | sensfile3 | setup_id3
                                ...
                           coadd1d end

                         OR the coadd1d read/end block can look like

                          coadd1d read
                                filename | obj_id | sensfile  | setup_id
                             spec1dfile1 | objid1 | sensfile  | setup_id
                             spec1dfile2 |        |           |
                             spec1dfile3 |        |           |
                                ...
                           coadd1d end

                        That is the coadd1d block is a four column list of
                        spec1dfiles, objids, sensitivity function files, and
                        setup_ids, but you can specify only a single objid,
                        sensfile, and setup_id for all spec1dfiles on the first
                        line

                        Here:

                        spec1dfile: full path to a PypeIt spec1dfile

                        objid: the object identifier (see details above)

                        sensfile: full path to a PypeIt sensitivity function
                        file for the echelle setup in question

                        setup_id: string identifier for the echelle setup in
                        question, i.e. 'VIS', 'NIR', or 'UVB'

                        If the coaddfile is not given the output file will be
                        placed in the same directory as the first spec1d file.


options:
  -h, --help            show this help message and exit
  -v, --verbosity VERBOSITY
                        Verbosity level, which must be 0, 1, or 2. Level 0
                        includes warning and error messages, level 1 adds
                        informational messages, and level 2 adds debugging
                        messages and the calling sequence.
  --log_file LOG_FILE   Name for the log file. If set to "default", a default
                        name is used. If None, a log file is not produced.
  --log_level LOG_LEVEL
                        Verbosity level for the log file. If a log file is
                        produce and this is None, the file log will match the
                        console stream log.
  --debug               show debug plots?
  --show                show QA during coadding process
  --par_outfile PAR_OUTFILE
                        Output to save the parameters
run
An example execution looks like this:
pypeit_coadd_1dspec FRB190714_LRISr_coadd1d_file.txt --show
A substantial set of output are printed to the screen, and if successful the final spectrum is written to disk. See below for the Current Coadd1D Data Model.
The parameters that guide the coadd process are also written
to disk for your records. The default location is coadd1d.par.
You can choose another location with the --par_outfile
option (see below).
Command Line Options
–show
At the end of the process, this will launch a matplotlib window showing the stacked spectrum on the bottom. The top panel illustrates the number of pixels included in the stack.
–par_outfile
This file will hold a listing of the parameters used to run the coadd1d process.
Parameters
Here we describe a set of parameters frequently defined in the Parameter Block of the coadd1d File.
Fluxing
The default parameters assume your spectra have gone through Fluxing. If not you should set:
[coadd1d]
    flux_value = False
If the data were fluxed, then the output flux spectrum will have units of
\([10^{-17} {\rm erg/s/cm^2/\mathrm{\mathring{A}}}]\).
Flux Scale
If your data has been fluxed, you may scale the coadded spectrum to a chosen value (typically a photometric measurement) in one of many filter curves.
To do so, you need to add the filter and magnitude
to the [coadd1d] block of the coadd1d file.
Here is an example:
[coadd1d]
    coaddfile = 'J121555.09-130116.0_LRISr_A.fits'
    filter = PS1-R
    filter_mag = 20.85
    filter_mask = 7187:7376
The call here will convolve the coadded spectrum with the PS1 r-band filter, and then scale the flux to give an AB magnitude of 20.85. Furthermore, the spectral wavelengths from \(7187 < \lambda < 7376 [\mathrm{\mathring{A}}]\) are masked in the analysis.
Filters
The list of available filters is provided in this file.
Scaling
Parameter |
Option |
Description |
|---|---|---|
scale_method |
default: auto |
scale the flux arrays based on the root mean square value (RMS) of the S/N^2 value for all spectra; if this RMS value is less than the minimum median scale value, no scaling is applied. If the RMS value is greater than the minimum but smaller than the maximum median scale value, the applied method is the median, as described below |
– |
hand |
scale the flux arrays using values specified by the user in the input parameter ‘hand_scale’. Must have one value per spectrum |
– |
median |
scale the flux arrays by the median flux value of each spectra |
Wave Method
You may want to specify the method used to construct the wavelength grid for
coadding your spectra. This is done by modifying wave_method in the
[coadd1d] block of your coadd1d file. The default method is linear,
which uses a fixed linear grid in wavelength. However, this may not be ideal
depending on your instrument set-up and observations.
Here is an example of some Keck LRISb data. After coadding the 1D spectra, you may see a noise pattern like this:
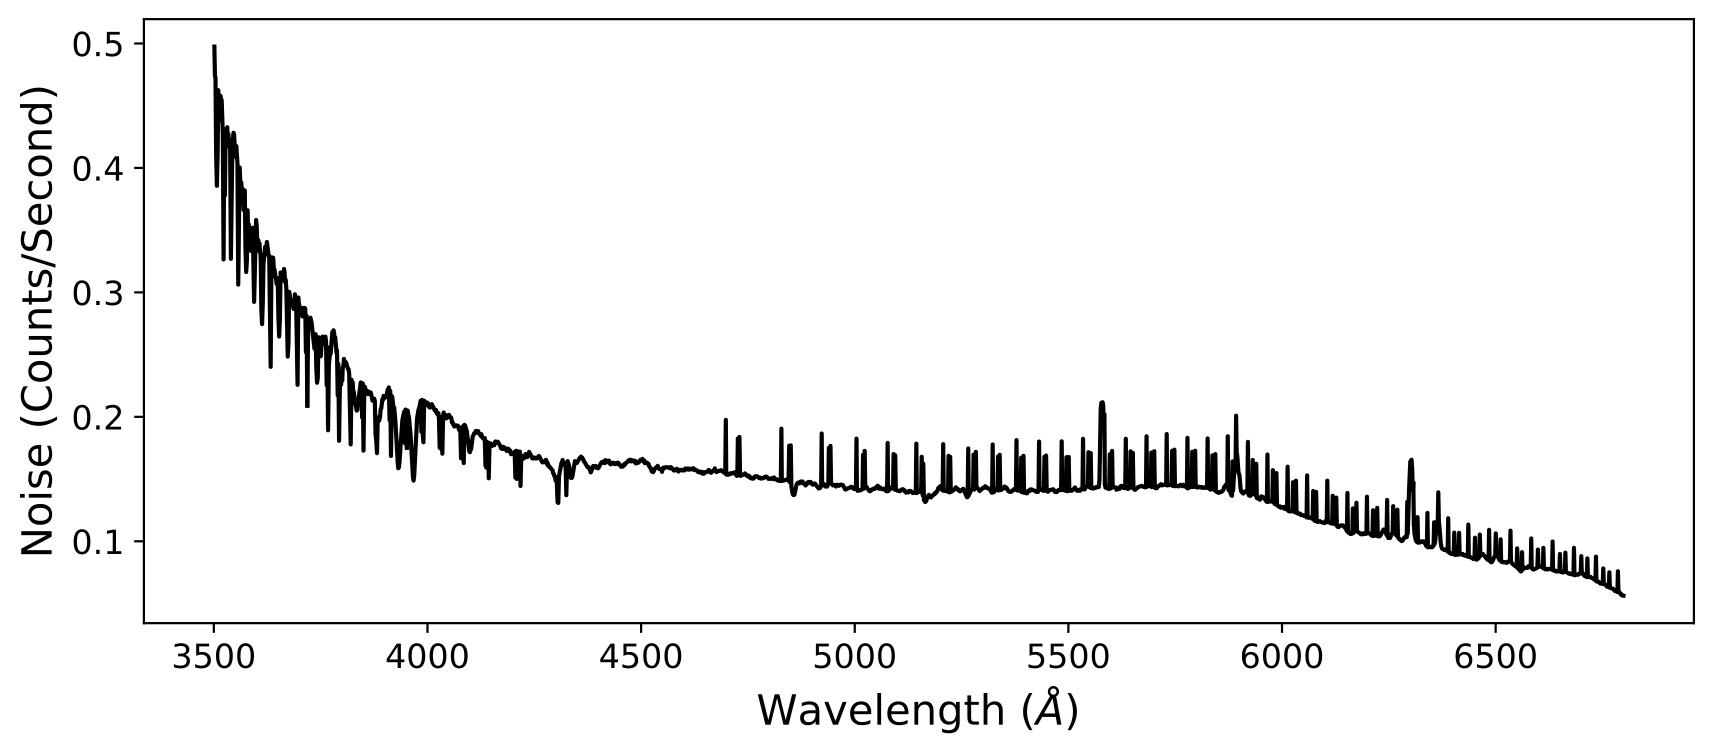
which, while still correct, may not be desirable. Note this figure was obtained
by plotting the quantity \(\frac{1}{\sqrt{\texttt{ivar}}}\) using the
ivar array in the second extension of the coadd1d file. This noise
pattern occurs because pypeit_coadd_1dspec does not interpolate the spectra,
in order to guarantee that neighboring pixels do not have correlated noise.
However, if your wavelength grid is such that multiple values land in one
re-binned pixel, this pattern will appear.
To avoid this noise pattern, you can modify the value of wave_method. For
example, if we use the iref option instead, the above example becomes:
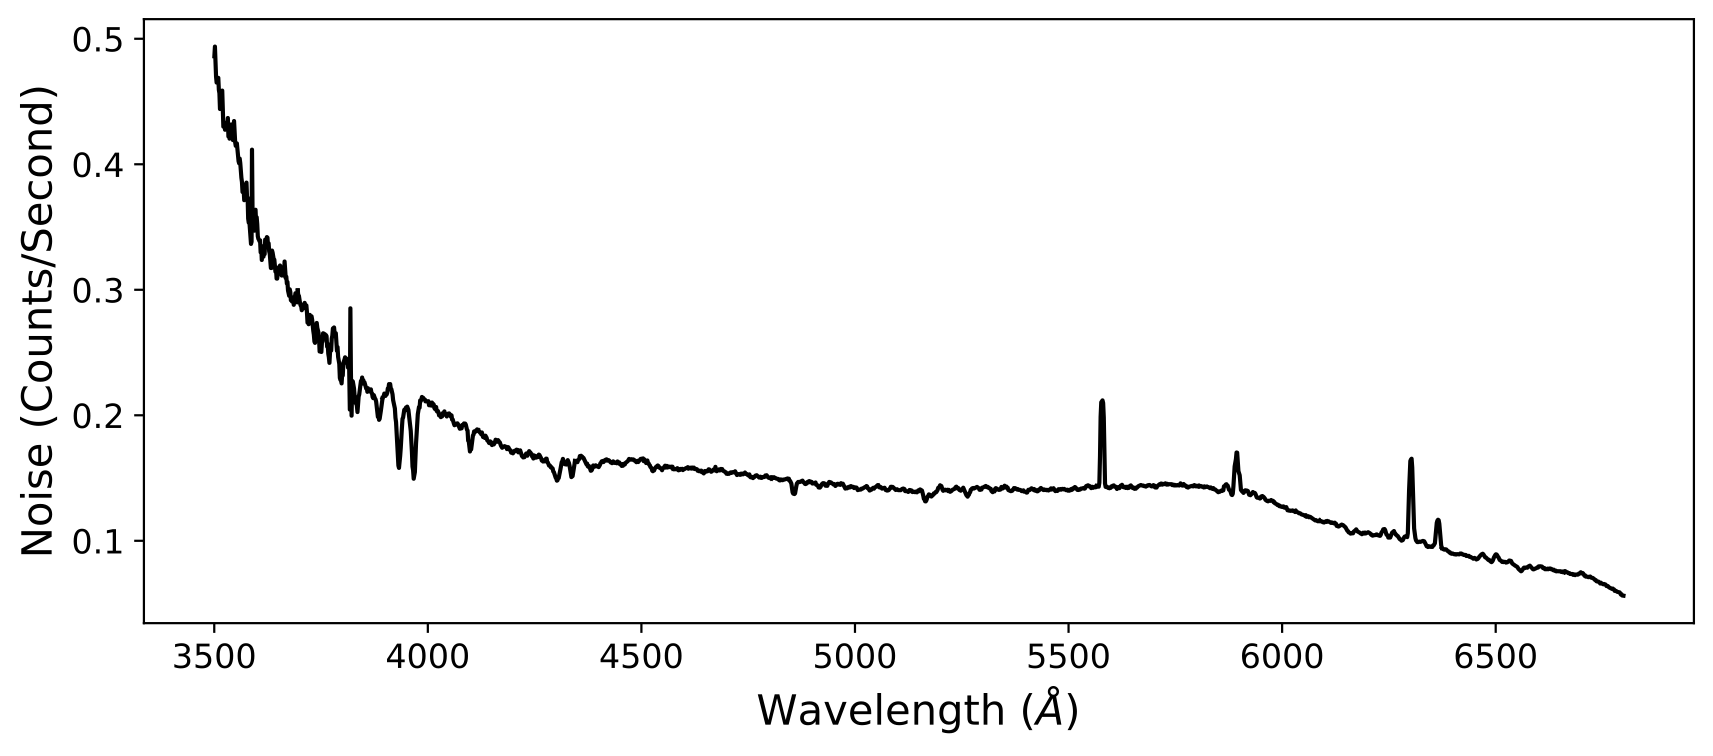
The iref option uses the grid of one of the spectra that you are coadding as
the wavelength grid. The reason why this works is because, in general, the
wavelength solution of a slit will be non-linear, so the pixel spacing will be
different between different wave_method options. For a linear grid, the
number of exposures contributing to a given pixel in the final grid is varying
because of how non-linear grids overlap with the linear grid. By using the
iref option or a linear grid with wider spacing, this effect can be reduced.
If your data contains exposures that aren’t dithered, the iref option will
coadd your exposures on the native wavelength grid, which will avoid the
fluctuations in the noise vector.
If your data contains exposures that are dithered a lot, iref will probably
give you similar noise fluctuations, so using a linear grid with wider spacing
may give you a better result. To change the spacing of the wavelength grid, you
can modify samp_fact in the [coadd1d] block of your coadd1d file. The
default value is 1.0. Setting samp_fact > 1.0 over-samples (finer grid),
while setting samp_fact < 1.0 under-samples (coarser grid).
Current Coadd1D Data Model
The result of the 1D coadding will be saved to a fits file. The file name can
be provided directly using the coadd1dfile parameter in the
coadd1d File or you can use the default. The default filename convention
is coadd1d_<target>_<instrument name>_<YYYYMMDD>.fits or
coadd1d_<target>_<instrument name>_<YYYYMMDD>-<YYYYMMDD>.fits, if the coadd
included more than one day’s worth of data. The default location of the file
will be along side the first spec1d file.
Currently instrument_name is
taken from the camera attribute of the relevant
Spectrograph class.
The format of the 1D coadd file follows the general
class OneSpec, such
that its file extensions are:
Version: 1.0.2
Obj Key |
Obj Type |
Array Type |
Description |
|---|---|---|---|
|
str |
|
|
|
str |
Extraction mode (options: BOX, OPT) |
|
|
ndarray |
floating |
Flux array in units of counts/s or 10^-17 erg/s/cm^2/Ang; see |
|
bool |
Boolean indicating if the spectrum is fluxed. |
|
|
ndarray |
floating |
Inverse variance array (matches units of flux) |
|
ndarray |
integer |
Mask array (1=Good,0=Bad) |
|
ndarray |
floating |
Object model for tellurics |
|
ndarray |
floating |
One sigma noise array, equivalent to 1/sqrt(ivar) (matches units of flux) |
|
dict |
header dict |
|
|
ndarray |
floating |
Telluric model |
|
ndarray |
floating |
Wavelength array (angstroms in vacuum), weighted by pixel contributions |
|
ndarray |
floating |
Wavelength (angstroms in vacuum) evaluated at the bin centers of a grid that is uniformly spaced in either lambda or log10-lambda/velocity |
To view the coadded spectrum, using pypeit_show_1dspec.
UVES_popler coaddition
If you prefer to use a GUI for the coaddition (to manually remove bad pixels, ghosts, cosmic rays etc.), then you can use the UVES_popler tool. This tool is developed by Michael Murphy and is available at this link. Here is an example of a coadded spectrum using UVES_popler:

UVES_popler was originally written to coadd ESO/UVES echelle spectra that were reduced by the ESO pipeline, and it has been recently modified to support the reduction of PypeIt longslit and echelle data. For details on how to use the tool, please refer to the UVES_popler documentation. To get you started with reading in PypeIt Spec1D Output files, you need to generate a text file that lists the absolute paths to the Spec1D Output files. Here is an example of how to generate this file:
ls -1 /path/to/your/pypeit_output/Science/spec1d/*.fits > /path/to/your/pypeit_output/pypeit_spec1d_files.txt
Then you can use this file as input to UVES_popler, by using the following command:
cd /path/to/your/pypeit_output/
UVES_popler -disp 50 -filetype 11 pypeit_spec1d_files.txt
This will launch the GUI, where you can interactively coadd your spectra. The
-disp 50 option is used to set the pixel sampling of the spectra to 50 km/s,
and the -filetype 11 option is used to specify that the input files are PypeIt
Spec1D Output files. For more information on the options available, you can
specify the -h option.